
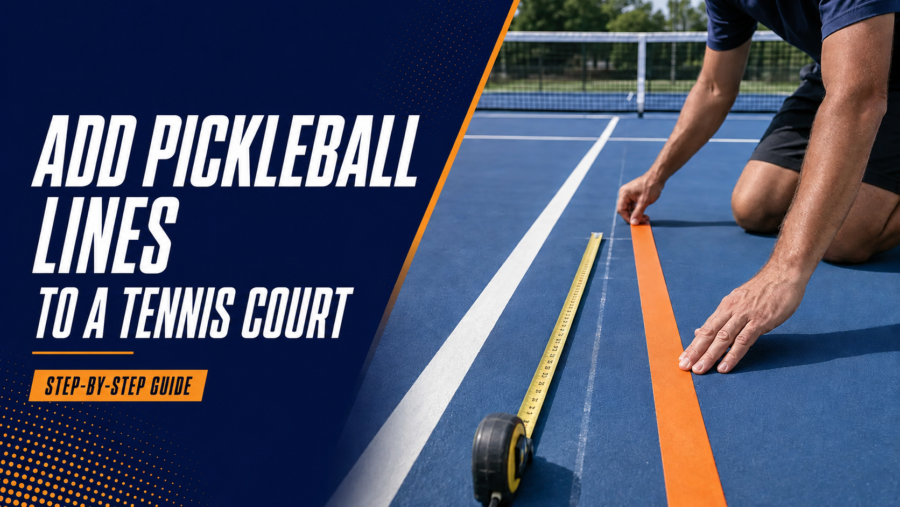
Adding pickleball lines to an existing tennis court can create a practical shared-use space without rebuilding the surface. The simplest layout places one 20 x 44ft pickleball court in the center of the tennis court, using the same net line but a correctly adjusted pickleball net.
The measurements are straightforward, but permission and surface compatibility come first. Permanent paint can affect tennis programming, line calls and eligibility for some sanctioned events, while unsuitable temporary tape can leave residue or damage an acrylic coating. Confirm the facility’s rules and the surface manufacturer’s requirements before marking anything.
Can a Tennis Court Be Used for Pickleball?
Yes. A standard pickleball court fits comfortably within the lines and surrounding space of a tennis court. One centered pickleball court is the easiest conversion because its net line aligns with the tennis net line and leaves substantial runoff around the smaller playing rectangle.
The sports do not use the same line dimensions or net height. Pickleball requires its own sidelines, baselines, non-volley-zone lines and centerlines. A regulation pickleball net is also lower in the middle than a correctly set tennis net.
The shared layout is a facility decision, not just a measuring exercise. Some tennis competitions or governing sections do not permit sanctioned play on courts that include additional permanent lines. A club, school, municipality or homeowners association may also require written approval before tape or paint touches the surface.
For the broader differences in court size, equipment and play, see the complete tennis vs pickleball comparison.
Pickleball Court Measurements at a Glance
The current USA Pickleball layout uses the same court size for singles and doubles. Measurements are taken to the outside edge of the perimeter and non-volley-zone lines.
| Court element | Measurement |
|---|---|
| Total playing rectangle | 20 x 44ft |
| Width from center to either sideline | 10ft |
| Distance from net to each baseline | 22ft |
| Non-volley-zone depth on each side | 7ft |
| Service-area depth | 15ft |
| Width of each service court | 10ft |
| Standard line width | 2in |
| Net height at center | 34in |
| Net height at pickleball sidelines | 36in |
The non-volley-zone line is commonly called the kitchen line. The centerline begins at that line and extends to the baseline on each side. It does not divide the non-volley zone on a standard court.
These markings define the court only. Players also need clear space outside the lines to move and stop. A tennis court normally provides ample room for one centered pickleball court, but gates, posts, benches, dividers and stored equipment still need to be checked.
The existing tennis layout is explained in the tennis court dimensions guide. Use the pickleball measurements above for the new lines rather than estimating from visual proportions.
Where the Pickleball Lines Sit on a Tennis Court
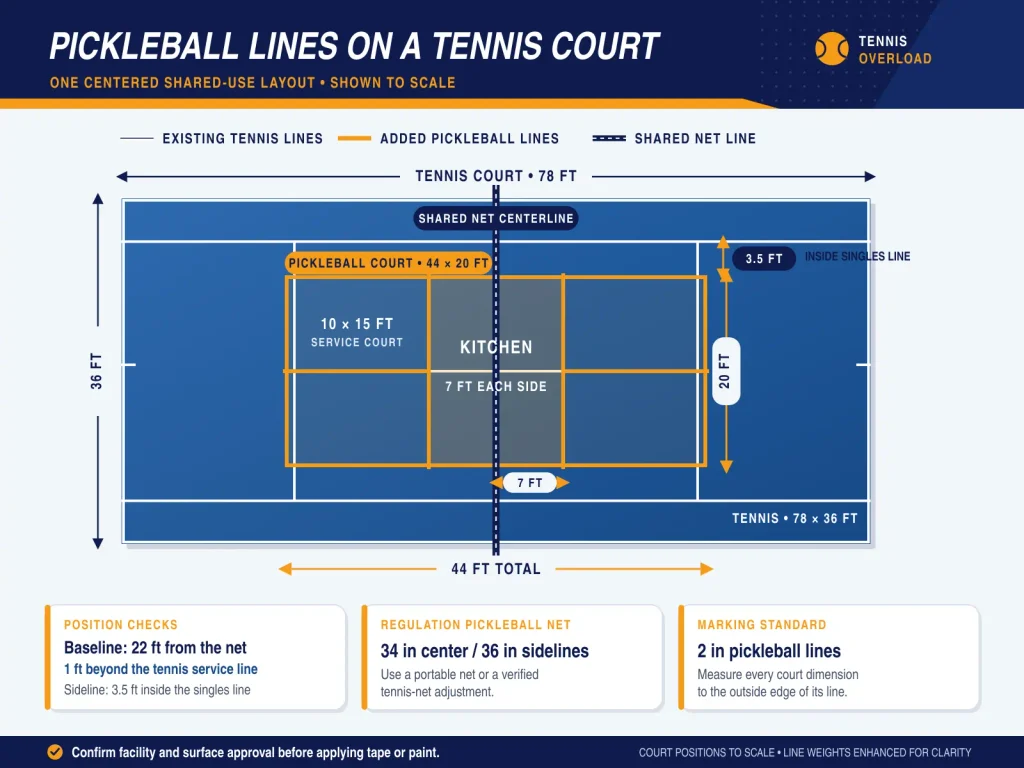
When one pickleball court is centered on a tennis court, the two sports share the same net centerline. The pickleball sidelines sit 10ft to either side of the court’s longitudinal center.
A tennis singles court is 27ft wide, so a centered pickleball sideline sits 3.5ft inside each tennis singles sideline. The pickleball baselines sit 22ft from the net. That places them 1ft behind the tennis service lines, which are 21ft from the net.
The pickleball non-volley-zone lines sit 7ft from the net on both sides. A centerline then divides each 20 x 15ft service area into two 10 x 15ft service courts.
Those convenient relationships are useful checks, not substitutes for measuring. Existing tennis lines may be worn, repainted or slightly irregular. Establish a center reference, measure the full pickleball rectangle and compare both diagonals before applying tape or paint.
Temporary Lines or Permanent Paint?
Choose the marking method before laying out the court. The correct option depends on ownership, how often pickleball will be played and whether tennis events still need an uncluttered surface.
| Method | Best use | Main advantage | Main limitation |
|---|---|---|---|
| Facility-approved removable tape | Occasional or trial use | Reversible and quick to install | Adhesive can lift, leave residue or affect some coatings |
| Temporary line kit or weighted markers | Short sessions and instruction | Minimal alteration to the surface | Can move and may not create complete regulation lines |
| Compatible acrylic sports-court paint | Regular shared use | Durable, clear layout | Permanent visual overlap and professional preparation needed |
| Full resurfacing with blended lines | Planned facility renovation | Cleanest integrated result | Greater cost and downtime |
Do not assume that any masking, duct or floor tape is safe for a sports surface. Ask the court owner and coating manufacturer which temporary product is acceptable, test it in an inconspicuous area and remove it according to the product instructions.
Permanent striping should use line paint designed for the existing sports-court system. Compatible acrylic line products are textured to work with athletic surfaces, while ordinary household paint can create an unsuitable finish or bond poorly. A sports-surface contractor is the safer choice for a valuable, cushioned, recently resurfaced or warranty-covered court.
What You Need
For a basic one-court layout, prepare:
- Written facility approval
- The current official court diagram
- A long tape measure that can cover the full court and diagonals
- A chalk line or removable layout string used only for positioning
- Small facility-approved temporary reference marks
- A carpenter’s square or right-angle layout method
- A straightedge
- Two people to hold long measurements accurately
- Approved temporary court tape or compatible sports-court line materials
- A regulation portable pickleball net or an approved tennis-net conversion method
Chalk, string and small marks are layout aids, not automatically suitable finished lines. Avoid any product that leaves loose powder, a raised edge or a slippery area where players move.
How to Add Pickleball Lines Step by Step
1. Get Permission and Confirm the Court’s Use
Identify who owns and manages the court. Ask whether the lines will be temporary or permanent, whether sanctioned tennis is hosted there, and whether a contractor or approved coating system is required.
Record the final decision. This prevents a technically accurate layout from becoming an unauthorized surface alteration.
2. Inspect the Surface and Surroundings
Check for cracks, peeling coating, standing-water marks, loose repairs and other damage. Striping over a failing surface does not repair it and can make a later resurfacing project harder to coordinate.
Also inspect the runoff area. Remove movable hazards and note fixed posts, benches, gates or divider systems that could interfere with pickleball movement. If the court needs structural work or a new surface, address that before adding lines.
The difference between a new build, reconstruction and resurfacing is covered in the complete guide to building a tennis court.
3. Establish the Net Center and Court Centerline
Use the center of the existing net line as the middle of the pickleball court. Mark a straight longitudinal centerline perpendicular to the net.
Do not rely only on the tennis center service line because it stops at the service line and may not establish the entire pickleball rectangle. Extend the reference accurately in both directions.
4. Mark the Pickleball Sidelines
Measure 10ft to each side of the longitudinal center. Establish two parallel sidelines running 22ft in each direction from the net, for a total length of 44ft.
If the court is centered correctly, each new sideline should be 3.5ft inside the adjacent tennis singles sideline. Recheck the 20ft outside-to-outside width at several points rather than assuming the two long lines stayed parallel.
5. Mark Both Baselines
Measure 22ft from the net centerline on each side and place a 20ft baseline between the pickleball sidelines. Each baseline should sit approximately 1ft behind the corresponding tennis service line on a standard layout.
Measure from the net reference, not from the tennis service line. The 1ft relationship is a useful verification after the actual 22ft distance has been established.
6. Mark the Non-Volley-Zone Lines
Measure 7ft from the net on both sides and mark a line across the full 20ft width. Measure to the outside edge required by the official layout.
Keep the two non-volley-zone lines parallel to the net. An error here changes the size of both the kitchen and the service courts, so check the 7ft distance at the left, center and right.
7. Add the Service Centerlines
Find the midpoint of each non-volley-zone line and each baseline. Connect those points to create a 15ft centerline on each half of the court.
The finished service boxes should each measure 10ft wide and 15ft deep. Do not continue the standard centerline through the non-volley zone.
8. Square and Verify the Layout
Confirm the outside dimensions, internal distances and line positions. Measure both diagonals of the 20 x 44ft rectangle. Equal diagonals are an important indication that the layout is square.
Check the following before making any permanent mark:
- Total outside width is 20ft
- Total outside length is 44ft
- Each baseline is 22ft from the net
- Each non-volley-zone line is 7ft from the net
- Each service court is 10 x 15ft
- Sidelines are parallel
- Baselines and kitchen lines are perpendicular to the sidelines
- Both diagonals match
Have a second person repeat the key measurements independently. A small setup error is much easier to correct before paint is applied.
9. Apply Temporary Tape or Permanent Lines
For temporary tape, clean and dry the approved surface area, follow the tape manufacturer’s directions and press the edges without stretching the tape out of alignment. Inspect it before every session and remove it if an edge begins lifting.
For permanent lines, follow the sports-surface system’s preparation, masking, primer, paint, temperature and curing instructions. Professional line paint may require a clean surface, sealed masking edges, one or more coats and a specific wait before play. Those requirements control over a generic tutorial.
Use one consistent line color that contrasts with the playing surface and is visually distinct from the tennis lines. Blended lines are often less distracting for tennis, but they still need enough contrast for pickleball players to see them clearly.
10. Set the Correct Net Height
A pickleball net measures 34in at the center and 36in at the pickleball sidelines. A tennis net is higher at its posts and uses a different width and profile.
A portable regulation pickleball net placed on the shared net line is the clearest temporary solution. If a facility uses the tennis net with a conversion strap or adjustment system, measure the height at the center and pickleball sidelines instead of assuming that lowering the middle is sufficient. The conversion must not damage the tennis net, posts or court.
11. Conduct a Final Safety Check
Walk the full court and runoff area. Confirm that temporary lines lie flat, permanent coatings are cured, the net is stable and no measuring tools or markers remain on the playing surface.
Play a short controlled test before opening the court for normal use. If players lose sight of the line system, catch a foot on tape or encounter a loose net component, stop and correct the setup.
Can More Than One Pickleball Court Fit on a Tennis Court?
Multiple pickleball courts can fit within the overall footprint of some tennis facilities, but fitting painted rectangles is not the same as creating safe playable courts. Each layout needs its own net, runoff, access route, separation from neighboring play and protection from tennis posts or fencing.
Four-court conversions often turn the pickleball courts perpendicular to the tennis court. That arrangement should be designed as a facility project rather than improvised from a one-court diagram. A qualified court professional can evaluate spacing, barriers, gates, drainage, accessibility and the effect on tennis programming.
If the goal is frequent pickleball rather than occasional shared use, dedicated courts or a planned multi-court conversion may provide clearer lines and safer traffic flow. The pickleball rules guide covers the playing context, while this page owns only the line-conversion process.
Common Mistakes to Avoid
Painting Before Checking Permission
Permanent lines can conflict with warranties, facility policy and sanctioned tennis requirements. Approval belongs at the beginning of the project.
Measuring From Worn Tennis Lines
Convenient offsets are useful checks, but the pickleball court should be built from its own center, net and outside dimensions.
Using the Tennis Net Without Measuring It
The sports use different net heights. A net that looks close can still be incorrect across the pickleball width.
Choosing the Wrong Paint or Tape
An incompatible product may peel, stain, create a raised edge or affect the underlying coating. Use only surface-approved materials.
Ignoring Runoff and Fixed Obstacles
The 20 x 44ft rectangle is not the full safety footprint. Players need space beyond the lines, especially behind the baselines.
Making All Lines the Same Color
New pickleball lines should be internally consistent but visually distinguishable from the tennis markings. A crowded layout increases line-call confusion in both sports.
Final Checklist
Start with written approval and a sound surface. Center the 20 x 44ft layout on the net, measure every line to the official outside edge, check both diagonals and use only approved marking materials.
Finish by setting a regulation net and inspecting the runoff area. A careful one-court conversion can serve both sports well, but a permanent or multi-court project deserves professional design so that added capacity does not compromise the surface, tennis use or player safety.
Frequently Asked Questions
How many pickleball courts fit on one tennis court?
One centered court is the simplest shared-use layout. Some tennis-court footprints can support multiple pickleball courts, but safe runoff, separate nets, access and barriers must be designed rather than inferred from line area alone.
Can pickleball use a tennis net?
Only if the net can be adjusted and verified at the pickleball dimensions without damaging the equipment. A portable pickleball net is usually the more predictable temporary solution.
How far is a pickleball baseline from the tennis service line?
On a standard centered layout, the pickleball baseline is 22ft from the net and the tennis service line is 21ft from the net. The pickleball baseline therefore sits about 1ft behind the tennis service line.
How far are pickleball sidelines from tennis singles sidelines?
A centered 20ft pickleball court is 7ft narrower than a 27ft tennis singles court. Each pickleball sideline sits 3.5ft inside the adjacent singles sideline.
Can ordinary paint be used for pickleball lines?
Ordinary household paint is not a suitable default. Use a compatible textured sports-court line system approved for the existing surface, or hire a sports-surface contractor.
Will temporary tape damage a tennis court?
It can, depending on the adhesive, coating, heat, moisture and how long it remains installed. Obtain permission, use a surface-approved product, test it and follow the removal instructions.
Do the new lines change how pickleball is played?
The markings create the standard playing areas, but players still need the correct net and rules. The guide to how to play pickleball provides the practical beginner sequence after the shared court is ready.